Showing posts with label review. Show all posts

Monday, March 21, 2016

Review : Maybelline The Nudes & Velvet Matte

Hi lovelies! Today i’m bringing you another DRUGSTORE product review, isn’t it exciting?:D For detailed review, swatches, and demo/tutorial please watch my video below : https://youtu.be/XUv_NfgLjes Since my last post is pretty lengthy, i’m gonna keep this one short and sweet. Maybelline The Nudes Eyeshadow Palette
The colors are gorgeous. I thought the gold one will be dupe for UD Half Baked but it is not pigmented :( Pros : Affordable Price, Rp 150,000.00 Available on Maybelline counters. Small and lightweight packaging. The eyeshadows are well chosen, 7 shimmer with 5 mattes ranging from light, medium, to dark shades. Eyeshadow quality is medium in my opinion. Not wow but not blah. Cons : You need to wear primer if you want this eyeshadow to stay all day. You need to take your time on blending. Not the most creamy eyeshadow but not too powdery either. Few eyeshadows are not pigmented. Overall : I think this palette is great for its price, if you are a beginner this is perfect. It’s affordable, full of neutral shades, and it has guidance for several makeup look on the back of this palette. Not the best eyeshadows (IMO) but not terrible either. 2. Maybelline Velvet Matte
Pros : Pigmented and not patchy. Applicator made application easy. Creamy and doesn’t dried out my lips. Cute packaging, resembles the elixirs a lot. Wear time, around 4 hours. Cons : Is not smudgeproof This is not like liquid lipsticks so don’t expect it too stay all day. Overall: I really liked this product, would recommend to someone that has dry lips but want a semi-matte finish. Since the texture is more creamy, it is comfortable to wear. That is for today’s post i hope this was helpful 😉 have a good day off! xo’s Nadya – urbanbeaute.com

My Facial Experience with Miracle Clinic

Hi lovelies! In today’s blogpost i’m sharing with you my first time experiencing facial treatment with miracle clinic. Overall i recommend this clinic and i see good results on my skin. So come with me and experience this together!!! To watch the full experience go over my youtube channel (video is in Bahasa, english subs coming soon) : Nadya Aqilla or play the video below. https://youtu.be/HiL-7IMJSsE I heard both awful and great things about facial treatment. They say the blackhead extraction is painful and makes your pores larger (which i find it doesn’t hurt too much and i haven’t noticed any different in my pores size) but it does makes your skin looks better, more fresh, clean, and blackhead-free. So when miracle clinic jakarta contacted me to invite me to their clinic and maybe try their facial, i’m really into it because i was soo curious
Miracle Clinic has both non medical treatment as well as the medical ones. Honestly, the medical ones scares me because i don’t like having needle close to my face, you know what i mean? So i chose to try one of their non medical treatment which is, Renew White Facial.
Basically, in this treatment they will gave you double peeling with glycolic acid to peel your dead skin resulting in brighter skin and minimizing the look of hyperpigmentation such as acne scars (which i do have a lot on my cheek area).
Besides that, they also extract my acnes.
Some of my acne is a bit stubborn so they have to do acne injections. I was freaking out first because, again, i don’t like having needle close to my face, but it’s not as bad as i thought. After the treatment my face does not go red except for on the acne (because of the extractions) and it goes away after a few days too.
Again, i was having a good experience with Miracle Clinic everyone is so nice and their practice is really sanitary. That’s all about my first facial experience, i hope you are having a good day and i talk to you soon! xo’s Nadya Aqilla.

ColourPop Lippie Stix Review and Swatches (Frida, Gossip, Leather)

Hello gorgeous! Today i will be reviewing the ColourPop Lippie Stix for you. But before i’m going to the review, i want to announce that i make videos on youTube now! Go check out my first video on the “No Makeup” Makeup Look after reading this blog post please :*
ColourPop is an online brand based on Los Angeles, USA. Their website currently only ships to USA, Canada, Australia, and New Zealand, since i live in Indonesia I have to get this babies from online distributors, specifically from mooishe.com and @dejoyofmakeup (instagram). Both online distributors are trusted and they packaged my order neatly and secure. The prize range is from IDR 115,000 to IDR 125,000. Another plus, ColourPop products are cruelty free and not tested on animals. THE REVIEW First, packaging. The Lippie Stix are packaged in a white simple tube, the size is perfect for you take on the go. On the bottom of the tube there is a color swatch so you can tell which color it is without opening the tube. The tip of the lipstick is small and perfectly shaped for the cupid’s bow, it makes the application so much easier. The product is only 1 g, compared to other lipstick (which usually 3-4 g) you don’t get a lot of product but this is an affordable product ($5 on their website) so i guess it’s worth the money (if you live where they ship directly to you of course). For comparison, i insert a pic of a regular Maybelline Lipstick (4.3 grams) side by side with the Lippie Stix
The product itself has great quality, they are so creamy (even the matte!) , smooth, non-drying, long wearing, and pigmented formula. The matte ones stayed on my lips for 6-7 hours, the satin ones stayed for around 4 hours. The matte one is not completely matte, they do have the slightest shine but this makes them creamy, smooth, and doesn’t tug or drag when applied. Overall i’m impressed with the formula. oh and they do have some sweet scent to them. Swatches
Frida (satin)
Frida is a mixed of peach and pink. A perfect nude that won’t make you look sick! This is my personal favorite, this color is created by CoffeeBreakWithDani Gossip (satin)
Gossip is a bright blue-based pink. I like to call this kind of shade “Barbie Pink”, on my warm skin tone this almost look like a purple-pink. Leather (matte)
Leather is a dark purple/grape color. It is one shade darker than MAC Rebel and a bit more purple. This one will leaves a beautiful berry stain on your lips. OVERALL THOUGHTS I really love this ColourPop Lippie Stix but I wish the prize is not that high.. 5 dollars is like IDR 65,000 but it retails here (as i said) around IDR 115,000 so it is not that “affordable” here in Indonesia than it is in USA. I understand that it is because shipping and etc but for that amount of product i really don’t want to pay that much since Maybelline, Revlon, and Wardah lipsticks are cheaper, give more amount of product and also has a good quality. Yeah so that is my review, i think the ColourPop Lippie Stix is worth the hype and worth checking out! Have a nice day, xo’s Nadya.

Revlon Colorstay Moisture Stain Review and Swatches

Hello friends! Welcome to another lippies review on urbanbeaute.com Kali ini yang akan aku bicarain adalah Revlon Colorstay Moisture Stain. Produk ini punya keunikan tersendiri nih karena mempunyai kelebihan kelebihan dari lipgloss lipstick lipbalm dan lipstain. Moisture Stain ini pigmented seperti lipstick jadi sekali ulas warna nya udah kelihatan, punya shine / gloss seperti lipgloss, moisturizing atau melembabkan bibir seperti lipbalm, dan akan meninggalkan stain atau efek warna natural di bibir kamu seperti lipstain. Keren kan? Here is what the Revlon’s website says about The Moisture Stain : A new level of glossy wet color. Saturated lips with brilliant shine and vivid color. Available in 12 luscious shades. Drenches lips in glossy wet color Ultra-light creamy lipstain with Vitamin E and Aloe 88% of women felt lips were instantly moisturized without stickiness PACKAGING Packaging dari Moisture Stain ini bentuknya seperti balok persegi panjang, menurutku agak makan tempat sih karena kotak tapi memang jadi unik. Warna kemasannya sama dengan warna produk didalamnya, seperti yang aku selalu bilang ini aku suka banget karena memudahkan untuk memilih warnanya. Isi produknya adalah 0.27 Fl Oz/8.0 mL. Untuk aplikatornya berbentuk seperti ini :
Aplikator sponge ini flat dan meruncing di ujungnya, jadi gampang pas dipake ke bibir apalagi bagian cupid’s bow (area runcing berbentuk huruf “M” di tengah bibir atas). SWATCHES
Ada 12 warna di koleksi produk Moisture Stain ini, yang aku punya adalah Barcelona Nights. Barcelona Nights ini warnanya bright pink dan tone nya warm jadi kalau dilihat lihat pink nya agak merah, seperti raspberry. Cocoknya sih warna ini di deskripsikan sebagai Raspberry Pink. Menurut aku warna ini cocok untuk kulit putih cerah, kulit kuning langsat seperti aku sampai kulit agak gelap seperti sawo matang. This suits a lot of skin tones in my opinion. This leaves a soft pink stain on my lips. PRODUCT Tekstur dari Revlon Moisture Stain ini agak thick atau lebih kental dibanding liquid lipstick, menurut aku teksturnya mirip lip gloss tapi ga lengket, agak balmy gitu. Pas pertama kali beli sih agak lebih liquid-y ya teksturnya tapi lama kelamaan jadi lebih seperti balm. Karena teksturnya itu, pas diaplikasikan agak susah supaya rata, tapi ini bisa kamu ratain pakai jari kamu kok. Produk ini pigmented dan long lasting. Warna dan gloss nya bisa tahan 2-3 jam dan selanjutnya warna dan gloss nya memudar dan meninggalkan stain. Stain ini bisa tahan sekitar 3-4 jam. Total nya produk ini bisa tahan selama 5-7 jam. Benar-benar all in one! Moisture Stain ini bisa kasih shine tanpa lengket dan bisa tahan lama sekaligus melembutkan bibir. Lipstick+Lipgloss+Lipstain+Lipbalm! This retails for IDR 89,000 di counter-counter Revlon. Kalau kamu seseorang yang cari suka lipgloss tapi benci lengketnya atau butuh pewarna bibir yang melembutkan juga, aku sangat merekomendasikan produk ini. What i don’t like is, sometimes it can be a lil patchy and uneven due to its texture tapi cuma sedikit kok dan seperti aku bilang bisa diratain dengan jari sebelum produknya set atau kering. But overall i love this, i would give a 4 out of 5 stars! xo’s Nadya.
Pros : Moisturizing Leaves a stain Pigmented Beautiful Shades Long lasting Cons : A bit patchy sometimes Bulky packaging

Etude House Drawing Eye Brow Pencil & Color My Brows Review

Hello Everyone! This time i will be reviewing two eyebrow products from Etude House, Drawing Eye Brow Pencil and Color My Brow, Brow Mascara.
For so long i’ve been on a quest to find an eyebrow pencil that will give me a natural look, and also a brow mascara to color my brow lighter so it will match my dyed hair. I really hope this two products can give me that. I got this products from Rakuten for a really affordable price, i belive the drawing eye brow costs about IDR 30,000 and the Color My Brows costs about IDR 70,000. The claim on the Etude House Websites are : Drawing Eye Brow, Soft textured eyebrow pencil comes with various color variants to match the color of skin and hair, giving it a natural and neat. Color My Brows, A mascara only for eyebrow to keep its layer neat and give natural but urbane color. What it does Hide dark & black brow: Providing natural and clear brow colors by hiding its own dark color. Easy & Quick brow coloring: Quickly dried to make brow layer and color fixed even while re-applying. Brow care: Allantoin, Beeswax, Carnauba wax provide nutrition and moisture on skin and brow. 1. Drawing Eye Brow : a. Packaging Packaging is so simple and really makes it easy for us. This product is double ended, it has the product on one end and a spoolie brush on the other end. I love that this is retractable, and the packaging makes the product comes out flat and thin rather that rounded as you can see in the picture below.
b. Product This eyebrow pencil is a bit hard in texture, which i prefer because it gives a softer strokes of color when applied. If an eyebrow pencil is soft and creamy, i think it can makes you overdrawn your eyebrow if you’re not careful. I like a creamy eyeliner because i want my eyeliner to look “there” but for eyebrow i prefer this texture because i like my eyebrow to looks more natural. I got the shades Gray Brown, which is a neutral dark brown. This is perfect for a brunette like me. There are 6 shades, dark brown, gray brown, brown, dark gray, gray, and black. The other browns looks quite warmer and reddish and there is no shades for lighter hair. The lightest shade is no 3 which is a medium warm brown. Since it is a Korean Brands i feel the shades is more suitable for Asian that usually have darker hair color. 2. Color My Brows a. Packaging The size of the products is 0.15 oz. / 4.5 g. Quite small and easy to put in your purse. The applicator is a medium size, i do wish it is smaller so it can be more precise but i think this size is fine. b. Product I got the darkest shade which is Rich Brown, this is a medium warm brown with some red tone in it. This one has lighter shades but still leans more to a warmer tone. There are 5 shades to choose, Rich Brown, Light Brown, Red Brown, Natural Brown, and Blondie Brown. From the picture on the website, i think the coolest shade is Natural Brown but unfortunately it is quite light for my dark hair. As the website says, it covers and color my black brow and make it lighter. It dries pretty quick and it also helps sets the brows so it last longer. If you already have naturally thick eyebrow, you can use this on its own it will look natural since you are just coloring your eyebrow and didn’t draw them on. However, if you have little hair in your brow i recommend you use this after using an eyebrow pencil or powder to color and set your brow. I don’t feel its moisturizing my brows but i didn’t expect a brow mascara to be. When i first swatches it on my hand i realize shimmer on this product, luckily it didn’t shows when you applied it to your brow because who wants shimmer on their brow anyway? I don’t understand why they put shimmer on it-_- SWATCHES
With Only Drawing Eye Brow in Gray Brown 02
With Only Color My Brows in Rich Brown 01
With Both Drawing Eye Brow and Color My Brows
For daily makeup i only use the Drawing Eye Brow Pencil, and for an event or whenever i need my brow to set longer i apply both the Drawing Eye Brow Pencil and the Color My Brows Brow Mascara. But when i’m in hurry and so lazy but still wants to have good looking brows, i will simply apply the Color My Brows. It will only take less than a minute and i’m good to go! Drawing Eye Brow Pros : Practical Hard texture yet pigmented Comes with a spoolie brush Affordable Retractable The product is thin and flat making it easy to draw thin strokes Drawing Eye Brow Cons : Limited Color Selection for Lighter Hair Colors Color My Brows Pros : Easy to use Pigmented Affordable Helps to set the brows Color My Brows Cons : Only available in warmer shades That’s all i have to say, overall I like both of the product especially the Drawing Eye Brow Pencil. Will definitely continue using both of this. Don’t forget to subscribe to my blog so you won’t miss a post and keep in touch with me on my social media, keep the positivity and have a good day everyone! xo’s Nadya.

Sleek Matte Me Review and Swatches

Hi everyone, hope you’re doing good today. Remember when I post a review of Lime Crime Velvetines? Those are beautiful but quite expensive, and with all the lime crime controversy you might want to try something else to substitute them.
These are the Sleek’s Matte Me, it is also a liquid lipstick that will dry matte. The concepts of this product is similar to the Lime Crime Velvetines. I got it for IDR 168.000 from an online shop on Instagram (@dejoyofmakeup) they sell ready stock makeup from brands that you cannot find in stores in Indonesia. I am quite pleased with this shop since the customer service is great and their packaging is awesome!
So cute right? And they also wrapped my lipsticks with bubble wrap so it’s extra secure! I definitely recommend them for you to check. Here is the product info on their website, “Matte Me is a matte finish liquid lipstick that glides on in one smooth application, with no need for a second coat. The light as air texture provides you with comfortable wear for hours, that doesn’t cake, flake or dry out, ensuring long lasting color all day.” Now, onto my review to see if the product lives up to how it’s claimed.. Packaging wise, I love it. It looks modern, sleek, and expensive looking (when they really aren’t that expensive. The clear glass bottle tells you the color of the product right away. The applicator is a slim sponge applicator and I don’t find it hard to apply on my lips.
The way I review this product will be a comparison to the Lime Crime Velvetines. The product is not tested on animals and available in 6 shades. I only got two, birthday suit and petal. Unlike Lime Crime, the available shades is quite “safe” and “traditional” which I don’t mind. It smells like lipsticks, doesn’t have any added scent to it. The Matte Me takes longer time to dry then the Velvetines, but once it dries it is completely matte. It doesn’t feel sticky right after you apply it but after couple of hours, it will be sticky and flaky it will also start to transfer. This doesn’t stay as long as Velvetines. The pigmentation is good but the lighter color, petal, is streakier when applied, making it hard to get smooth application. Here are some swatches for you!
Petal
Petal is a neutral tone baby pink. On medium to tan skin, it’ll make your skin looks even tanner and give the “exotic” feels to your face. But it is tricky to apply on pigmented lips because it is a light color. Birthday Suit
Birthday Suit is a very natural pink with a bit of brown to it. Depending on your natural lip color, it can be a nude with brown undertone or a brownish pink. I think this color is gorgeous and so wearable, I can see a lot of skin tone looks amazing with this. Pros : Affordable Loving the shades available Quite Long Lasting Con : It is drying and tends to sit on the cracks and lines on your lips ( look at my lip swatch to see the lines) After couple of hours, it will flake, be sticky, and can transfer. Overall : i still think lime crime velvetines are better than this but I prefer the shades on Sleek’s Matte Me.

Revlon Colorburst Matte Balm & Balm Stain Review

Happy Friday everyone! Today I am going to review a lip product from Revlon! Lately every makeup brands are coming out with a lot of lip product, that’s why I’m going to review more on lippies this week. Selamat Hari Jumat semuaa! Hari ini aku akan review dua produk dari Revlon. Akhir akhir ini aku lihat brand brand makeup banyak yang ngeluarin produk bibirnya, jadi aku bakal review banyak produk pewarna bibir minggu minggu ini.
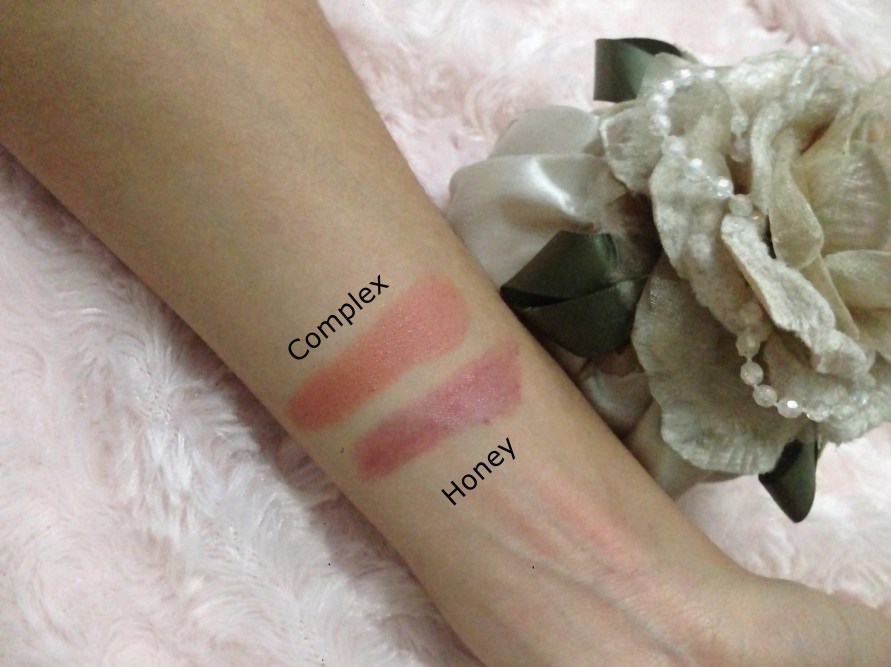
UPDATE 23 JUNE 2015 I got new shade of the matte balm! These are Revlon Colorburst Matte Balm and Balm Stain. They are two similar products but also a bit different. The similarity is they are a balm type of product, so obviously, both of them are moisturizing and won’t dried out your lips. The difference is Matte Balm has Matte finish, when Balm Stain is more sheer, natural, and glossy. Ini adalah Revlon Colorburst Matte Balm dan Balm Stain. Dua produk ini mirip tapi punya sedikit perbedaan juga. Kesamaannya adalah keduanya itu balm, yang mana akan melembabkan bibir. Perbedaannya Matte Balm itu Matte, sedangkan Balm Stain lebih glossy dan tipis pigmentasinya. First, let’s talk about the packaging. It kinda reminds me of a crayon because it looks like a big lip pencil to me, similar to Clinique’s Chubby Stick. It is retractable so you won’t have to keep sharpening it. The color of the packaging match the color of the product inside, so it will be easier for you to choose the color. Matte Balm has Matte packaging and Balm Stain has glossier packaging. Pertama, kita lihat packagingnya. Menurut aku agak kayak krayon ya karena bentuknya seperti pensil bibir tapi besar, mirip chubby stick nya Clinique. Gausah repot ngeraut karena bisa diputar untuk ngeluarin produknya. Warna packagingnya juga sama kayak warna produknya jadi gampang untuk milih warnanya. Kalau yang Matte Balm packagingnya Matte juga, yang Balm Stain packagingnya lebih glossy. Now let’s move to the product itself, as I said before they are moisturizing for your lips. Both of them has a decent staying power, I feel like after a while the Balm Stain gloss will go away but it does stain on your lips. It is not touch proof whatsoever but I find both of them last 4-5 hours on me. It has minty scent and feel to it, which I don’t like because it gives you a mint and cool sensation on your lips. I find that it gives me tingly feeling on my dry lips, but it does goes away after 5 minutes or so. My friends don’t mind the mint though so it depends on your personal preferences. Matte Balm is more pigmented than Balm Stain since it is matte. Here are some swatches: Sekarang produknya sendiri ya, seperti yang udah aku bilang ini sangat moisturizing. Ketahanan warnanya lumayan bagus, kalau yang Balm Stain setelah beberapa lama kamu aplikasikan gloss nya akan hilang dan bakal ninggalin stain di bibir kayak kalau kamu pake lip tint. Di aku kedua produk ini tahan sekitar 4-5 jam. Ada wangi mint di produknya, bahkan pas di aplikasikan bibir kamu bakal kerasa dingin dingin ala sensasi mint gitu. Aku sih kurang suka ya, tapi rasa ini bakal ilang setelah sekitar 5 menit kok. Temen temen aku yang pake ini juga ga keganggu sama sensasi mint ini, jadi ya balik lagi tergantung kamunya. Matte Balm itu pigmentasinya lebih bagus daripada Balm Stain karena dia Matte sedangkan yang Balm lebih ke gloss/stain. Ini swatches nya :
Complex (Matte Balm)
Complex (Matte Balm) is a light warmer nude. I feel since it is a nude, it is a bit flaky and not as smooth when I apply it. It accentuate my dry lips. So if you have dry lips like me I recommend you exfoliate before or just try the brighter color. But I actually love the color! Complex (Matte Balm) adalah warna nude yang tone nya warm jadi lebih ke orange daripada ke pink. Mungkin karena ini warnanya muda banget, jadi bibir aku yang kering malah tambah kelihatan setelah pakai ini. Kurang smooth gitu pas diaplikasiin agak streaky. Jadi kalau kamu bibirnya kering mungkin coba exfoliate dulu sebelum pakai ini atau pilih warna yang lebih tua aja. Tapi sebenernya aku suka warna ini. Elusive (Matte Balm)
Elusive (Matte Balm) I lovee this shade! It’s a neutral mid-tone pink, it’s not too warm and not to cool. This color really brightens my face. Elusive (Matte Balm) Aku sukaaaa banget warna ini, karena warnanya netral dan tone nya di tengah tengah. Ga terlalu terang tapi ga nude, warnanya ga terlalu hangat tapi juga ga terlalu dingin. Warna ini bikin mukaku kelihatan lebih cerah dan fresh. Honey (Balm Stain)
Honey (Balm Stain) is a mauve-y pink. It is actually a bit darker than the color of the tube. This gives me a natural gloss at first, but it leaves a beautiful reddish pink stain after a while. This color is so natural looking, i think it will suits a lot of skin tones. Honey (Balm Stain) adalah warna pink agak keunguan (mauve). Agak lebih gelap dibanding warna tube nya. Warna ini bakal ninggalin stain warna pink kemerahan di bibir kamu. Warna ini natural banget jadi menurut aku cocok untuk hampir semua warna kulit. Pros : Moisturizing Retractable Good lasting power lovely variet of shades/color Cons : Mint SensationOverall : I love this! Will be looking out for the other color for my collection xo’s Nadya

Monomola Lip Color / Lip Tattoo First Impression and Review

Happpy Tuesday! Today i’ll be reviewing another lip product, but this one is very different. Monomola Lip Color / Lip Tattoo from Korea is not a Lip Tint, Lip Gloss or Lipstick, actually this is similar to Lip Tint but it has gel texture, more lasting power and the application process is different. Lip Tattoo will not smudge or transfer throughout the day even after drinking or eating. The stain is soooo strong! and very natural too. Why it won’t smudge? Because it will stain your lips. Is it drying? It is recommended to use Lip Balm before using this product. As long as you do this it won’t dried out your lips. How to use Lip Tattoo? Put the Lip Tattoo gel in one direction on your upper lips first, then your lower lips. Wait 15-20 minutes. Then peel it out (do it on your lower lips first) and it will leave a natural stain. Where to buy? If you’re not living in Korea, I will recommend try finding this item online. This is so affordable, i found it Rp 85.000 on ig and on Rakuten Indonesia i found it on sale for Rp 50.000 Your thoughts? I like it! it won’t transfer, it leave natural stain, it doesn’t dried out my lips, and the price is so good. The downside is you do have to wait for 15-20 minutes and because of the gel teture it is a bit tricky to apply but if you messed up it won’t really affect the result. Thanks for reading my blog, xo’s Nadya! *Special Thanks to my cousin, @distyaveligha (on ig) to let me use her Lip Tattoo for this reviewing purpose. Go send her my regards by checking her out on ig, her feeds are to die for!
Happy Tuesday! Hari ini aku mau review produk pewarna bibir lagi, tapi ini beda banget aku belum pernah nyoba yang semacem ini sebelumya. Lip Color / Lip Tattoo Monomola dari Korea ini bukan Lip Tint, Lip Gloss atau Lip Stick sebenernya mirip sama Lip Tint sih tapi pengaplikasiannya yang beda dan tahan lebih lama. Oh iya Lip Tattoo ini teksturnya juga cenderung seperti gel bukan cair/liquid. Sesuai namanya Lip Tattoo ini nempel banget di bibir, ga akan luntur walaupun kamu udah minum atau makan. Malah aku coba tiban dengan lipstick biasa untuk campur warnanya (karena warnanya terlalu terang untuk aku) dan pas aku hapus lipsticknya, lip color nya masih stain bibir aku dong. Kenapa bisa tahan lama sih? Karena warna dari Lip Tattoo ini bakal ninggalin stain di bibir kamu ga cuma ngelapisi kayak lipstick biasa. Bikin bibir kering gak? Sebelum pakai Lip Tattoo dianjurkan kamu pakai Lip Balm dulu supaya ga kering. Aku pakai Lip Balm dulu dan bibir aku ga jadi kering kok. Malah ada olshop yg klaim ini bisa melembutkan bibir karena bisa mengangkat sel kulit mati di bibir. Aku sih ga notice bibir aku jadi lebih lembut. Terus gimana cara pakai nya? Lip Tattoo ini kamu olesin kebibir atas kamu dulu, olesinnya harus searah ya gaboleh bolak balik aplikasinya. Lalu olesin di bibir bawah. Warna Lip Tattoo awalnya emang terang banget tapi nanti akan jadi natural jadi jangan takut. Tunggu sekitar 15-20 menit supaya warnanya lebih meresap, lalu kamu kelupas Lip Tattoo nya arah yg berlawanan dengan pas kamu olesin. Direkomendasikan untuk kelupas yang di bibir bawah dulu. Nanti hasilnya bibir kamu akan stained. Warnanya apa aja? Ada sweet orange, sexy red, rose pink, lovely peach, dan cherry red. Yang aku coba cherry red. Ohiya warna bisa berbeda tergantung warna asli bibir kamu ya, contohnya di bibir aku warnanya agak pink karena warna dasar bibir aku yg terang sedangkan di sepupu aku lebih kelihatan merahnya karena dasar bibirnya memang kemerahan. Oke, belinya dimana? Aku lihat online shop di instagram sudah banyak yang jual ini sekitar Rp 85.000, atau kamu bisa visit Rakuten karena aku liat ada shop yang promo jual ini cuma dengan harga Rp 50.000! Your thoughts? I like it! Bener bener ga ilang atau luntur dan harga nya terjangkau, ditambah ga bikin bibir ku kering tapi ya kamu harus nunggu 15-20menit. Saran aku pake Lip Tattoo ini dulu baru dandan yang lain, jadi setelah kamu selesai makeup Lip Tattoo nya juga udah siap dikelupas. Dan karena teksturnya gel agak susah buat make dengan rapih, tapi walaupun aku pakenya berantakan hasilnya tetep bagus kok. Terimakasih udah baca blog aku, xo’s Nadya! *Special Thanks to my cousin, @distyaveligha (on ig) to let me use her Lip Tattoo for this reviewing purpose. Go send her my regards by checking her out on ig, her feeds are to die for!

Makeup Class with Make Over Indonesia ( Thoughts / Review of the products)

Kira kira sebulan yang lalu, aku sempet ikut Makeup Class yang diadain kampus aku (LSPR) dan kerjasama dengan Make Over Indonesia. Jadi, setiap meja ada 5 kursi dan di setiap meja itu ditaruh produk produk dari Make Over yang akan kita pakai untuk kelas nanti. Pengajarnya dari Make Over sendiri, di depan ada pengajarnya yang peragain di model sambil kasih tips makeupnya nah nanti kita ikutin arahan dari Miss nya dan juga ada beberapa Miss yang siap bantu kita kalau kita bingung atau butuh dibantu. Ohiya kalau di Make Over, shop assistant nya dipanggil Miss hehe. Ini nih yang ada di meja aku.
Selain makeup, MakwOver juga nyiapin kaca, brush kit, kain pelindung baju, dan semacam headband supaya rambutnya ga kena makeup. Sayang banget aku ga sempet fotoin produk nya satu satu karena fokus sama kelasnya:( Hari ini mereka akan ajarin professional look yang pas untuk dipakai ke tempat kerja. Pertama, kita disuruh bersihin wajah dulu pakai makeup remover dari Make Over. Setelah itu, pakai Hydration Serum. Serum ini fungsinya untuk melembutkan kulit dan baik dipakai sebelum makeup supaya makeup nya juga lebih mudah di apply. Aku suka tekstur nya yang ga lengket dan mudah meresap, produk ini juga bikin kulitku lembab. Then, ada corrective base makeup yaitu primer berwarna ungu dan hijau. Fungsi primer yang ungu untuk menetralkan skin tone yang merah dan yang ungu untuk mencerahkan skin tone yang kuning langsat. Menurut aku primer kayak gini hanya perlu untuk kulit yang extremely red or extremely yellow, kalau skin tone kalian cenderung netral lebih baik langsung foundation aja. Next Step is Foundation. Aku pake Ultra Cover Liquid Matt Foundation. Coveragenya Medium, finish nya natural, tidak dewy tapi ga super matte juga. Ada 7 shade, guides dari websitenya gini : #01 #02 Fair skin #03 Olive skin #04 #05 Dark Olive skin #06 #07 Deep skin and Male makeup. Aku campur shade yang warna 2 dan 4 untuk dapetin shade yang pas untuk aku. Concealer! Aku suka banget sama concealer palette nya karena lengkap banget shade nya. Light beige cocok untuk highlight, beige bisa untuk menyamarkan jerawat, green untuk cancel redness, purple untuk mencerahkan skin tone, dan orange perfect untuk cancel mata panda. Ini dupe nya concealer palette nya MUFE banget menurutku, tapi harganya terjangkau. Untuk powder ada dua pilihan yaitu Perfect Cover Two Way Cake dan Silky Smooth Translucent Powder . Two Way Cake nya aku memang sudah pernah pakai sebelumnya dan aku suka karena ini sekalian foundation jadi bisa nambah coverage di kulit kamu. Kalau kamu gabutuh coverage lebih dan cuma mau bikin wajah kamu ga mengkilap aku lebih recommend Translucent Powder nya. MakeOver sebenarnya punya produk contour nya sendiri (yang aku denger keren sih) tapi aku ga kedapetan nyoba produk itu jadi aku kontur wajah pakai eyeshadow coklat tua yang ada di trivia eye shadow nya. Untuk Blush, kita di siapin Blush Palette nya. Aku mix yang peach dan light pink untuk pipiku. Menurut aku blush nya kurang pigmented.. Untuk eye shadow kita disiapin Trivia Eye Shadow in Emperor Brown. Perfect untuk eye look simple. Eye look yang diajarin mirip sama eye look Cinderella Makeup di blog aku. MakeOver eye shadows are definitely the star of the collection. Aku suka banget dan aku rekomen banget karena kualitas nya yang keren dan harga yang terjangkau. Love it. It’s time to define your eye! Untuk produk eye brow pencil, mascara, dan eye liner nya menurut aku so-so sih ga jelek tapi ga awesome juga menurutku. Lastly is lip! Waktu kelas itu yang disiapin adalah Lip Palette nya ini juga so-so menurut aku. Brushes nya aku kurang suka karena menurut aku agak kasar. Aku memang agak pemilih untuk brush makeup sih hehe.
Untuk kelasnya sendiri menurut aku cukup informatif, karena aku memang sudah well known sama makeup jadi memang ga terlalu berasa manfaat kelasnya tapi buat temen aku yang sama sekali ga ngerti makeup itu informatif banget. Sayang yang diajarkan lebih ke professional look, walaupun jadi lebih luas dan simpel tapi menurutku kalau look yang diajarin lebih sulit ilmu yang didapat juga lebih banyak. Jadi kesimpulannya adalaaah : Love it! : Trivia Eyeshadow Liquid Foundation Concealer Palette Two Way Cake Powder Hydration Serum So-so : Mascara Eye Brow Pencil Liquid Eye Liner Lip Palette Translucent Powder Not recommending : Corrective Base Makeup Blush Palette Brush Mini Kit I hope you like this review! Have a nice day:)

SKYE Lounge & Restaurant

Located on the 56th floor of BCA Tower, M.H. Thamrin, Jakarta SKYE is famous of their beautiful view of the city skyline. You can access SKYE from Grand Indonesia Mall. This Restaurant is consisted of two main areas, rooftop lounge and the dining area. For fancy dinner, you can try the modern dining area but since i want to try the rooftop lounge this time and i only want to have light meals, i pick the lounge this time. The lounge has casual and fun vibes to it. And yes, the view is so cool, so Jakarta! Berlokasi di lantai 56 Menara BCA, Jalan M.H. Thamrin, Jakarta, SKYE terkenal dengan pemandangan kota nya yang indah. Untuk ke SKYE kita bisa naik lift ke Menara BCA dari Mall Grand Indonesia. Restoran ini terbagi menjadi dua area yaitu rooftop lounge nya dan dining area. Untuk yang ingin fancy dining, kalian bisa coba dining area nya yang ber-arsitektur modern. Karena aku sudah pernah dinner di dining area nya dan aku cuma pengen cemal cemil, kali ini aku mau coba rooftop lounge nya yang lebih bersifat santai dan fun. Dan yep view nya keren, dapet banget Jakarta nya!
Me and my friends ended up ordering some chicken wings and their mocktails. The chicken wings was IDR 75000 and the mocktails was IDR 50000. To me, that is overpriced. The food was ok and the mocktails were great but they still a bit overpriced to me, but then again i think the view and the ambience pays for it. Kami pesan chicken wings dan mocktails. Harga chicken wings nya Rp 75000 dan mocktailsnya Rp 50000. Untuk aku harganya agak kemahalan. Makanannya ok dan mocktails nya enak, tapi aku tetap ngerasa itu kemalahan.Tapi kalau dilihat dari sisi lain, view dan atmosfer restorannya memang keren jadi menurutku harganya pas karena hal itu.
Pros : the view is cool, you can see Jakarta’s great skyline interior, good to take a lot of pictures the mocktails, i love red velvet Cons : they have strict dresscode, women have to use heels and semi-formal attire , men cannot wear shorts and sandals (wear shoes) i recommend you dressed up if you want to visit SKYE usually crowded especially on weekends pricy menu What i’m wearing : mom’s denim jacket white t-shirt (i got it from an outlet) pencil skirt from stradivarius nude heels from mango xo’s Nadya