Showing posts with label makeup. Show all posts

Wednesday, June 14, 2017

Pengalaman Dandanin Miss Indonesia dan Menjadi Sariayu Beauty Avengers 2017!


Di malam tanggal 24 April, perasaan aku campur aduk! Gimana engga? Keesokan hari nya aku akan berkesempatan untuk menjadi salah satu Sariayu Beauty Avengers bersama 3 Beauty Blogger dan 4 Fashion Blogger lainnya, Marcella Kikyanto (Querramelca), Fitri Aulia, Kak Ini Vindy, Aldila Sabrina (Lyla Andalucia), Kak Harumi, Cindy Karmoko, dan Vanessa Andrea (cherrydreamy). Excited, tapi super anxious karena aku akan dikasih challenge yang saat itu aku belum di kasih tau challenge nya apa. Tahun lalu aku cuma bisa nonton video Sariayu Beauty Avengers 2016 lewat YouTube aja, ga nyangka tahun ini aku bisa ikut partisipasi! 


Dan keesokan harinya, tanggal 25 April, ternyata kami, para Sariayu Beauty Avengers, dibagi menjadi 4 kelompok. Masing masing kelompok terdiri dari satu Beauty Blogger dan satu Fashion Blogger yang di challenge untuk make over Miss Indonesia 2017! Aku setim dengan Vanessa dan kami ditantang untuk makeup dan juga styling Miss Sulawesi Utara, Runner Up II Miss Indonesia 2017, the gorgeous, Ivanrel Eltrisna Sumerah, dalam waktu yang singkat. Setelah ngobrol ngobrol dengan Miss Sulawesi Utara ternyata she's not only beautiful but also smart and talented! Ohiya, Miss Indonesia yang di dandani oleh tim lain ada Miss Aceh, Sekar Audifa, Miss NTB Achintya Nilsen, dan Miss Sumatera Utara, Friska Olivia Panggabean.


Sariayu Beauty Avengers 2017 ini terinspirasi dari makna "Aku Cantik Indonesia" menurutku Aku Cantik Indonesia adalah kecantikan yang berasal dari hati, dan terceminkan dari perilaku. Kecantikan wanita Indonesia, sangatlah beragam, dan aku berpendapat bahwa dengan memaknai "Aku Cantik Indonesia" kita harus bangga akan keberagaman yang kita miliki, bahwa setiap wanita Indonesia cantik dengan caranya masing masing.


Tema yang aku dan Vanessa angkat untuk makeup dan wardrobe Miss Sulawesi Utara adalah Flowers of Tomohon. Warna warna makeup dan outfit yang kami pilih terinspirasi dari cantiknya warna bunga di Festival Tomohon yang menggambarkan cantiknya wanita Sulawesi Utara dalam keberagamannya. Dan untuk produk makeup yang aku gunakan adalah Two Way Cake shade Light, Sariayu Color Trend Inspirasi Gili Lombok Eyeshadow Kit, Lipstick Apokayan 01, Duo Lip Color GL 05, dan Liquid Eye Shadow GL 03. Range warna dari produk Sariayu ini impressive banget menurutku karena hampir semua warna ada! Untuk eyeshadownya bahkan sampai warna hijau, ungu, dan biru pun ada. Ditambah lagi Liquid Eye Shadow dari Sariayu sangat mudah untuk di aplikasikan. 


Buat kalian yang ingin mencoba produk produk yang aku pakai untuk mendandani Miss Sulawesi Utara, kalian bisa membeli Flowers of Tomohon package di : bit.ly/PaketMissIndonesiaBeautyAvengers2 atau di www.marthatilaarshop.com untuk produk Sariayu lainnya. 

It was one of a kind experience dan aku sangat berterimakasih pada Sariayu untuk pengalaman dan kesempatan yang luar biasa. Terima kasih juga untuk Miss Indonesia, khususnya Miss Sulawesi Utara. It was definitely an honor to be Sariayu Beauty Avengers! Untuk lihat video lengkap Sariayu Beauty Avengers 2017 kamu bisa cek di sini : https://www.youtube.com/watch?v=1JJckJ5IdyI 

Monday, March 21, 2016

Formal Event / Night Makeup : Romantic Pink Smokey Eye

Hi guys! I’m back with another tutorial, this is my first real tutorial on youTube so please watch the tutorial on my youTube channel here This makeup look is perfect for your formal events but you still want to look romantic and soft. I hope this tutorial useful for you and you guys like it! Have a nice day, xo’s Nadya. https://youtu.be/ieyV05lkdI8 Product Used : Masami Shouko no 27 Masami Shouko no 219 Armando Caruso no 19 Real Techniques Expert Face Brush MUFE Double Ended Sculpting Brush Armando Caruso no 18 Masami Shouko 309 Revlon Colorstay Oily/Combo Foundation in Natural Beige Nyx Full Coverage Concealer in Tan MUFE Full Cover Concealer Maybelline Minerals Concealer in Medium Sand Guerlain Translucent Powder in 02 Claie MUFE Sculpting Kit 02 MUFE Blush in 08 Sivanna Highlighter Colourpop Lippie Stix in Frida UD Naked 1 Palette in Virgin UD Naked 2 Palette in Booty Call UD Naked 3 Palette in Dust, Limit, Nooner the Balm Nude ‘tude in Sexy, Serious Revlon Colorstay Eyeliner in Black Maybelline Color Tattoo in Too Cool Nyx Eyebrow Kit in Brunette Etude House Color My Brow Barbie Eyelashes in 205 Victoria’s Secret Set & Prime

ColourPop Lippie Stix Review and Swatches (Frida, Gossip, Leather)

Hello gorgeous! Today i will be reviewing the ColourPop Lippie Stix for you. But before i’m going to the review, i want to announce that i make videos on youTube now! Go check out my first video on the “No Makeup” Makeup Look after reading this blog post please :*
ColourPop is an online brand based on Los Angeles, USA. Their website currently only ships to USA, Canada, Australia, and New Zealand, since i live in Indonesia I have to get this babies from online distributors, specifically from mooishe.com and @dejoyofmakeup (instagram). Both online distributors are trusted and they packaged my order neatly and secure. The prize range is from IDR 115,000 to IDR 125,000. Another plus, ColourPop products are cruelty free and not tested on animals. THE REVIEW First, packaging. The Lippie Stix are packaged in a white simple tube, the size is perfect for you take on the go. On the bottom of the tube there is a color swatch so you can tell which color it is without opening the tube. The tip of the lipstick is small and perfectly shaped for the cupid’s bow, it makes the application so much easier. The product is only 1 g, compared to other lipstick (which usually 3-4 g) you don’t get a lot of product but this is an affordable product ($5 on their website) so i guess it’s worth the money (if you live where they ship directly to you of course). For comparison, i insert a pic of a regular Maybelline Lipstick (4.3 grams) side by side with the Lippie Stix
The product itself has great quality, they are so creamy (even the matte!) , smooth, non-drying, long wearing, and pigmented formula. The matte ones stayed on my lips for 6-7 hours, the satin ones stayed for around 4 hours. The matte one is not completely matte, they do have the slightest shine but this makes them creamy, smooth, and doesn’t tug or drag when applied. Overall i’m impressed with the formula. oh and they do have some sweet scent to them. Swatches
Frida (satin)
Frida is a mixed of peach and pink. A perfect nude that won’t make you look sick! This is my personal favorite, this color is created by CoffeeBreakWithDani Gossip (satin)
Gossip is a bright blue-based pink. I like to call this kind of shade “Barbie Pink”, on my warm skin tone this almost look like a purple-pink. Leather (matte)
Leather is a dark purple/grape color. It is one shade darker than MAC Rebel and a bit more purple. This one will leaves a beautiful berry stain on your lips. OVERALL THOUGHTS I really love this ColourPop Lippie Stix but I wish the prize is not that high.. 5 dollars is like IDR 65,000 but it retails here (as i said) around IDR 115,000 so it is not that “affordable” here in Indonesia than it is in USA. I understand that it is because shipping and etc but for that amount of product i really don’t want to pay that much since Maybelline, Revlon, and Wardah lipsticks are cheaper, give more amount of product and also has a good quality. Yeah so that is my review, i think the ColourPop Lippie Stix is worth the hype and worth checking out! Have a nice day, xo’s Nadya.

the Balm Nude ‘tude Eyeshadow Palette Review & Swatches

Now I know this palette has been around for a long time now but I just got it a week ago and fell in love with it. So i just have to write a review about it! This palette consists 12 neutral shadows ranging from cool to warm tones, from matte to shimmer finish, from light to dark color. It has every color you need to create a neutral eyeshadow look. It is a bit pricy ( IDR 650,000 at SOGO’s the Balm counter ) but if you actually divided the price for 11g of products and compare it to other brands eyeshadow (such as Nyx) it isn’t too pricy. Here is the description from the Balm website, This amazing palette consists of 12 beautiful shadows that make wearing nudes sexy! These satiny smooth colors can be applied naturally, i.e. “let me slip into something more comfortable” or beautifully layered. The wide range gives you light highlighters as well as brazen bold shades that work to add definition and emphasis to your lids. Nude`tude allows you to dramatically dress up your eyes—if nothing else! THE REVIEW
The packaging is so slim, making it the perfect palette for travelling. It comes with a dual ended brush (eyeliner and shadow brush) and also has a nice size mirror ( a big plus for me). You got 12 shadows with about 11g of product in total. The packaging is cardboard, so it is light and durable. It is closed with magnet. But the highlight of the palette is it is SOOO CUTE! It has vintage vibes all over it! The drawback for me is you can accidentally make the palette dirty from the eyeshadow if you’re not careful when you pick the product with your brush, since the packaging is so lovely i don’t want to get it dirty :( The brush that it comes with is an okay quality, i actually keep it and used it several times. The eyeshadow quality is very good, this shadows are pigmented, easy to blend, and not powdery. I notice this doesn’t fall out as much as Urban Decay Naked Palletes but a tiny bit harder to blend. It lasted well on my lids but i still recommend to use eyeshadow primer if you’re going to use this shadow all night long. These eyeshadow never creases on me. Swatches : Sassy – Snobby – Stubborn – Stand-Offish – Selfish – Sultry without Flash
with Flash
Sophisticated – Seductive – Sexy – Silly – Serious – Sleek without Flash
with Flash
Sassy : a frosty white. Snobby : a shimmery pale gold. Stubborn : a frosty light peachy pink (swatched lighter than how it looks in the pan) Stand-Offish : a frosty peach with shimmer. Selfish : a satin medium taupe (grayish brom) Sultry : a neutral matte medium brown. Perfect for blending. Sophisticated : a dark brown with tiny bronze shimmer. Seductive / Schitzo : a bronze with pearl finish. Sexy : a matte reddish brown, warm burgundy / cranberry. (loveeee this) Silly : a warmer dark brown with reddish glitter. Serious : a matte black. Sleek : a matte dark chocolate brown. Overall thoughts, i love this palette. If i ever travel this would be the only eyeshadow palette i’m bringing! It has wide variety of color, durable, light, and includes mirror! My favorite colors is Seductive, Sexy, and Stand-offish. the Balm had come out with the another palette in this same theme called Nude Dude, I have swatched that on the counter but i prefer the color selection in this palette over the newer edition. I did a berry tone smokey eye tutorial using this palette click here to see! As always thanks for reading my blog, have a good day and xo’s!! Pros : Good color selection Excellent packaging Very nice quality of eyeshadow Cons : I guess i didn’t have a con on this one :p

How to Hide Under Eye Dark Circle and Eye Bags : Cara Menutupi Lingkaran Hitam (Gelap) Bawah Mata dan Kantung Mata

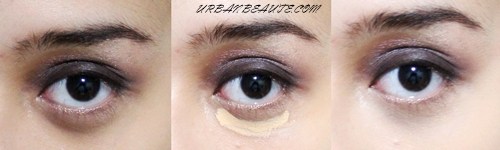
Hello beautiful people! a Friend of mine asked me to post a tutorial about hiding or concealing dark circle and eye bags, so that is what exactly i’m doing for you today! !ALERT! THIS POST WILL BE WRITTEN IN BAHASA Untuk nutupin kantung mata, caranya agak beda dengan cara nutup area gelap di bawah mata. Jadi aku bakal jelasin cara nya satu satu ya. Kalau aku masalah nya itu lebih ke area gelap di bawah mata, kantung mata sebenernya ga parah tapi kalau aku senyum baru deh tuh kebentuk banget kantung matanya. Nah coba kalian ngaca dulu, masalahnya itu dimana? Memang area bawah mata kalian yang gelap atau gelapnya karena bayangan dari kantung mata kamu? Nanti teknik nya kalian sesuain sama kebutuhan masing masing yaa. Btw, kalian bisa klik disini untuk lihat tutorial eye makeup yang aku pakai di tutorial ini ya:) 1. Dark Circle : Lingkaran Gelap di Bawah Mata Kalau kalian lihat lebih dekat, kebanyakan lingkaran gelap di bawah mata itu berwarna kebiruan atau keunguan , ga bener bener coklat atau hitam. Untuk nutupin warna biru nya gabisa kalau pake concealer warna muda aja, karena kalau hanya itu area bawah matamu cuma akan jadi lebih terang tapi masih keliatan agak biru, hasilnya malah jadi ashy gitu. Apalagi kalau kalian pake concealer nya yang warna agak kuning, dark circle kalian bisa malah jadi agak hijau keliatannya. Untuk counteract biru, kita butuh warna orange. Kenapa orange? Karena orange adalah complementary color dari warna biru. Complementary color itu apa? Complementary color itu adalah “lawannya” warna tersebut atau warna paling kontras dari warna tersebut. Kalau kalian lihat color wheel, warna biru tepat ada di sebrang warna orange. Ini artinya mereka adalah pasangan complementary colors. Kedua warna ini kalau dicampur, akan menetralkan satu sama lain atau meniadakan/membatalkan satu sama lain. Coba deh kalian main cat warna, kalau orange dicampur biru hasilnya akan jadi coklat which is netral dan skintone itu cenderung netral kan. Warna orange itu bisa kita dapet di corrector yang berwarna peach/orange atau concealer yang berwarna peach untuk kulit terang sampai medium dan berwarna orange untuk kulit berwarna medium sampai kulit berwarna gelap. Loh kok jadi peach sih tadi kan katanya orange? Iya, karena warna bawah mata kita tuh ga biru sempurna ,hanya undertone nya yang biru, jadi warna peach juga bisa netralin. Make Up Forever, MakeOver, dan Nyx masing masing punya produk corrector nya sendiri, tinggal kalian pilih aja. Setelah warna biru nya sudah dinetralin dengan corrector baru kita kasih concealer yang berwarna terang supaya area bawah mata kita jadi terang. Aku suka apply concealer seperti segitiga terbalik di bawah mataku, sekalian untuk highlight muka ku soalnya. Nah ini dia fotonya, di foto kanan atas keliatan kan concealer nya netralin warna gelap di bawah mataku?
Ini perbandingan antara corrector+concealer vs concealer aja. Yang gapake corrector keliatan ada hint hijau sedikit kan? Kelihatan agak ashy dan kurang natural juga.
Kiri: Corrector+Concealer Kanan: Concealer Only 2. Eye Bags : Kantung Mata Kalau masalah kamu hanya di kantung mata, kita bisa nutupin dengan manipulasi bayangan, light&shadow. Area yang lebih terang pasti kelihatan lebih luas dan lebih “maju”, sedangkan area yang gelap akan kelihatan lebih “masuk” makanya kita pakai warna terang di tulang pipi dan warna gelap di bawah tulang pipi, untuk kasih efek tulang pipi yang lebih “maju” atau lebih kelihatan dan juga supaya lebih tirus. Kalau kamu punya kantung mata dan kamu kasih concealer yang terang di kantungnya malah bikin kantungnya tambah kelihatan “maju” dong? tambah besar dong? Nah yang harusnya ditutup dan diberi warna terang itu bayangan dibawah kantungnya. Kalau gaada bayangan atau warna gelap di bawah kantungnya, itu bakal kasih ilusi kalau kantung mata kita gaada, bikin ilusi bawah mata kita itu lebih rata dibanding aslinya.
Jadi, hindari pakai concealer tepat di kantung matanya, keep concealer cuma di bawah kantung mata alias di bayangannya. Jangan lupa di set concealer nya pakai loose powder, supaya long lasting dan ga creasing. Kalau kalian coba tips nya, post foto kamu di ig pakai hashtag #urbanbeautedotcom ya dan jangan lupa tag aku di @nadyaaqilla supaya aku bisa liat hasilnya di kamu. Ohiya eye look yang aku pakai di tutorial ini bakalan aku post juga tutorialnya jadi kalau tertarik pantengin terus ya blog aku. Semoga dengan ini aku bisa bantu kamu ngatasin dark circle maupun eye bags ya, goodluck! xo’s Nadya.

Sleek Matte Me Review and Swatches

Hi everyone, hope you’re doing good today. Remember when I post a review of Lime Crime Velvetines? Those are beautiful but quite expensive, and with all the lime crime controversy you might want to try something else to substitute them.
These are the Sleek’s Matte Me, it is also a liquid lipstick that will dry matte. The concepts of this product is similar to the Lime Crime Velvetines. I got it for IDR 168.000 from an online shop on Instagram (@dejoyofmakeup) they sell ready stock makeup from brands that you cannot find in stores in Indonesia. I am quite pleased with this shop since the customer service is great and their packaging is awesome!
So cute right? And they also wrapped my lipsticks with bubble wrap so it’s extra secure! I definitely recommend them for you to check. Here is the product info on their website, “Matte Me is a matte finish liquid lipstick that glides on in one smooth application, with no need for a second coat. The light as air texture provides you with comfortable wear for hours, that doesn’t cake, flake or dry out, ensuring long lasting color all day.” Now, onto my review to see if the product lives up to how it’s claimed.. Packaging wise, I love it. It looks modern, sleek, and expensive looking (when they really aren’t that expensive. The clear glass bottle tells you the color of the product right away. The applicator is a slim sponge applicator and I don’t find it hard to apply on my lips.
The way I review this product will be a comparison to the Lime Crime Velvetines. The product is not tested on animals and available in 6 shades. I only got two, birthday suit and petal. Unlike Lime Crime, the available shades is quite “safe” and “traditional” which I don’t mind. It smells like lipsticks, doesn’t have any added scent to it. The Matte Me takes longer time to dry then the Velvetines, but once it dries it is completely matte. It doesn’t feel sticky right after you apply it but after couple of hours, it will be sticky and flaky it will also start to transfer. This doesn’t stay as long as Velvetines. The pigmentation is good but the lighter color, petal, is streakier when applied, making it hard to get smooth application. Here are some swatches for you!
Petal
Petal is a neutral tone baby pink. On medium to tan skin, it’ll make your skin looks even tanner and give the “exotic” feels to your face. But it is tricky to apply on pigmented lips because it is a light color. Birthday Suit
Birthday Suit is a very natural pink with a bit of brown to it. Depending on your natural lip color, it can be a nude with brown undertone or a brownish pink. I think this color is gorgeous and so wearable, I can see a lot of skin tone looks amazing with this. Pros : Affordable Loving the shades available Quite Long Lasting Con : It is drying and tends to sit on the cracks and lines on your lips ( look at my lip swatch to see the lines) After couple of hours, it will flake, be sticky, and can transfer. Overall : i still think lime crime velvetines are better than this but I prefer the shades on Sleek’s Matte Me.

Monomola Lip Color / Lip Tattoo First Impression and Review

Happpy Tuesday! Today i’ll be reviewing another lip product, but this one is very different. Monomola Lip Color / Lip Tattoo from Korea is not a Lip Tint, Lip Gloss or Lipstick, actually this is similar to Lip Tint but it has gel texture, more lasting power and the application process is different. Lip Tattoo will not smudge or transfer throughout the day even after drinking or eating. The stain is soooo strong! and very natural too. Why it won’t smudge? Because it will stain your lips. Is it drying? It is recommended to use Lip Balm before using this product. As long as you do this it won’t dried out your lips. How to use Lip Tattoo? Put the Lip Tattoo gel in one direction on your upper lips first, then your lower lips. Wait 15-20 minutes. Then peel it out (do it on your lower lips first) and it will leave a natural stain. Where to buy? If you’re not living in Korea, I will recommend try finding this item online. This is so affordable, i found it Rp 85.000 on ig and on Rakuten Indonesia i found it on sale for Rp 50.000 Your thoughts? I like it! it won’t transfer, it leave natural stain, it doesn’t dried out my lips, and the price is so good. The downside is you do have to wait for 15-20 minutes and because of the gel teture it is a bit tricky to apply but if you messed up it won’t really affect the result. Thanks for reading my blog, xo’s Nadya! *Special Thanks to my cousin, @distyaveligha (on ig) to let me use her Lip Tattoo for this reviewing purpose. Go send her my regards by checking her out on ig, her feeds are to die for!
Happy Tuesday! Hari ini aku mau review produk pewarna bibir lagi, tapi ini beda banget aku belum pernah nyoba yang semacem ini sebelumya. Lip Color / Lip Tattoo Monomola dari Korea ini bukan Lip Tint, Lip Gloss atau Lip Stick sebenernya mirip sama Lip Tint sih tapi pengaplikasiannya yang beda dan tahan lebih lama. Oh iya Lip Tattoo ini teksturnya juga cenderung seperti gel bukan cair/liquid. Sesuai namanya Lip Tattoo ini nempel banget di bibir, ga akan luntur walaupun kamu udah minum atau makan. Malah aku coba tiban dengan lipstick biasa untuk campur warnanya (karena warnanya terlalu terang untuk aku) dan pas aku hapus lipsticknya, lip color nya masih stain bibir aku dong. Kenapa bisa tahan lama sih? Karena warna dari Lip Tattoo ini bakal ninggalin stain di bibir kamu ga cuma ngelapisi kayak lipstick biasa. Bikin bibir kering gak? Sebelum pakai Lip Tattoo dianjurkan kamu pakai Lip Balm dulu supaya ga kering. Aku pakai Lip Balm dulu dan bibir aku ga jadi kering kok. Malah ada olshop yg klaim ini bisa melembutkan bibir karena bisa mengangkat sel kulit mati di bibir. Aku sih ga notice bibir aku jadi lebih lembut. Terus gimana cara pakai nya? Lip Tattoo ini kamu olesin kebibir atas kamu dulu, olesinnya harus searah ya gaboleh bolak balik aplikasinya. Lalu olesin di bibir bawah. Warna Lip Tattoo awalnya emang terang banget tapi nanti akan jadi natural jadi jangan takut. Tunggu sekitar 15-20 menit supaya warnanya lebih meresap, lalu kamu kelupas Lip Tattoo nya arah yg berlawanan dengan pas kamu olesin. Direkomendasikan untuk kelupas yang di bibir bawah dulu. Nanti hasilnya bibir kamu akan stained. Warnanya apa aja? Ada sweet orange, sexy red, rose pink, lovely peach, dan cherry red. Yang aku coba cherry red. Ohiya warna bisa berbeda tergantung warna asli bibir kamu ya, contohnya di bibir aku warnanya agak pink karena warna dasar bibir aku yg terang sedangkan di sepupu aku lebih kelihatan merahnya karena dasar bibirnya memang kemerahan. Oke, belinya dimana? Aku lihat online shop di instagram sudah banyak yang jual ini sekitar Rp 85.000, atau kamu bisa visit Rakuten karena aku liat ada shop yang promo jual ini cuma dengan harga Rp 50.000! Your thoughts? I like it! Bener bener ga ilang atau luntur dan harga nya terjangkau, ditambah ga bikin bibir ku kering tapi ya kamu harus nunggu 15-20menit. Saran aku pake Lip Tattoo ini dulu baru dandan yang lain, jadi setelah kamu selesai makeup Lip Tattoo nya juga udah siap dikelupas. Dan karena teksturnya gel agak susah buat make dengan rapih, tapi walaupun aku pakenya berantakan hasilnya tetep bagus kok. Terimakasih udah baca blog aku, xo’s Nadya! *Special Thanks to my cousin, @distyaveligha (on ig) to let me use her Lip Tattoo for this reviewing purpose. Go send her my regards by checking her out on ig, her feeds are to die for!

Makeup Class with Make Over Indonesia ( Thoughts / Review of the products)

Kira kira sebulan yang lalu, aku sempet ikut Makeup Class yang diadain kampus aku (LSPR) dan kerjasama dengan Make Over Indonesia. Jadi, setiap meja ada 5 kursi dan di setiap meja itu ditaruh produk produk dari Make Over yang akan kita pakai untuk kelas nanti. Pengajarnya dari Make Over sendiri, di depan ada pengajarnya yang peragain di model sambil kasih tips makeupnya nah nanti kita ikutin arahan dari Miss nya dan juga ada beberapa Miss yang siap bantu kita kalau kita bingung atau butuh dibantu. Ohiya kalau di Make Over, shop assistant nya dipanggil Miss hehe. Ini nih yang ada di meja aku.
Selain makeup, MakwOver juga nyiapin kaca, brush kit, kain pelindung baju, dan semacam headband supaya rambutnya ga kena makeup. Sayang banget aku ga sempet fotoin produk nya satu satu karena fokus sama kelasnya:( Hari ini mereka akan ajarin professional look yang pas untuk dipakai ke tempat kerja. Pertama, kita disuruh bersihin wajah dulu pakai makeup remover dari Make Over. Setelah itu, pakai Hydration Serum. Serum ini fungsinya untuk melembutkan kulit dan baik dipakai sebelum makeup supaya makeup nya juga lebih mudah di apply. Aku suka tekstur nya yang ga lengket dan mudah meresap, produk ini juga bikin kulitku lembab. Then, ada corrective base makeup yaitu primer berwarna ungu dan hijau. Fungsi primer yang ungu untuk menetralkan skin tone yang merah dan yang ungu untuk mencerahkan skin tone yang kuning langsat. Menurut aku primer kayak gini hanya perlu untuk kulit yang extremely red or extremely yellow, kalau skin tone kalian cenderung netral lebih baik langsung foundation aja. Next Step is Foundation. Aku pake Ultra Cover Liquid Matt Foundation. Coveragenya Medium, finish nya natural, tidak dewy tapi ga super matte juga. Ada 7 shade, guides dari websitenya gini : #01 #02 Fair skin #03 Olive skin #04 #05 Dark Olive skin #06 #07 Deep skin and Male makeup. Aku campur shade yang warna 2 dan 4 untuk dapetin shade yang pas untuk aku. Concealer! Aku suka banget sama concealer palette nya karena lengkap banget shade nya. Light beige cocok untuk highlight, beige bisa untuk menyamarkan jerawat, green untuk cancel redness, purple untuk mencerahkan skin tone, dan orange perfect untuk cancel mata panda. Ini dupe nya concealer palette nya MUFE banget menurutku, tapi harganya terjangkau. Untuk powder ada dua pilihan yaitu Perfect Cover Two Way Cake dan Silky Smooth Translucent Powder . Two Way Cake nya aku memang sudah pernah pakai sebelumnya dan aku suka karena ini sekalian foundation jadi bisa nambah coverage di kulit kamu. Kalau kamu gabutuh coverage lebih dan cuma mau bikin wajah kamu ga mengkilap aku lebih recommend Translucent Powder nya. MakeOver sebenarnya punya produk contour nya sendiri (yang aku denger keren sih) tapi aku ga kedapetan nyoba produk itu jadi aku kontur wajah pakai eyeshadow coklat tua yang ada di trivia eye shadow nya. Untuk Blush, kita di siapin Blush Palette nya. Aku mix yang peach dan light pink untuk pipiku. Menurut aku blush nya kurang pigmented.. Untuk eye shadow kita disiapin Trivia Eye Shadow in Emperor Brown. Perfect untuk eye look simple. Eye look yang diajarin mirip sama eye look Cinderella Makeup di blog aku. MakeOver eye shadows are definitely the star of the collection. Aku suka banget dan aku rekomen banget karena kualitas nya yang keren dan harga yang terjangkau. Love it. It’s time to define your eye! Untuk produk eye brow pencil, mascara, dan eye liner nya menurut aku so-so sih ga jelek tapi ga awesome juga menurutku. Lastly is lip! Waktu kelas itu yang disiapin adalah Lip Palette nya ini juga so-so menurut aku. Brushes nya aku kurang suka karena menurut aku agak kasar. Aku memang agak pemilih untuk brush makeup sih hehe.
Untuk kelasnya sendiri menurut aku cukup informatif, karena aku memang sudah well known sama makeup jadi memang ga terlalu berasa manfaat kelasnya tapi buat temen aku yang sama sekali ga ngerti makeup itu informatif banget. Sayang yang diajarkan lebih ke professional look, walaupun jadi lebih luas dan simpel tapi menurutku kalau look yang diajarin lebih sulit ilmu yang didapat juga lebih banyak. Jadi kesimpulannya adalaaah : Love it! : Trivia Eyeshadow Liquid Foundation Concealer Palette Two Way Cake Powder Hydration Serum So-so : Mascara Eye Brow Pencil Liquid Eye Liner Lip Palette Translucent Powder Not recommending : Corrective Base Makeup Blush Palette Brush Mini Kit I hope you like this review! Have a nice day:)

Makeup Tutorial : Sexy Smokey Eyes

Hello everyone! Today, i will be doing this sexy smokey eyes. This eye look is a bit subtle than the usual smokey eyes, that’s why i am calling it the “sexy” smokey eye because it is not too dark yet still has the sexiness of smokey eyes. I love wearing this particular look and use this technique because it enhances my round and brown eyes. Halo semua! Hari ini aku mau kasih tau step step untuk dapetin sexy smokey eyes makeup. Smokey eyes yang ini lebih lembut dan ga segelap smokey eyes biasanya, makanya aku bilang “sexy” smokey eyes karena ini ga se grunge smokey eyes biasa tapi tetep sexy. Aku suka banget teknik makeup kayak gini karena bikin mata ku jadi tambah keliatan bulat, dan bikin warna coklat di mataku tambah keliatan.
Pict 1 : Prime your eyes using either eye primer or a concealer Pict 2&3 : Frame your brow using brow pencil Pict 4 : Fill your brow using brow powder Pict 5 : Set the brow using brow mascara, i’m using the lash mascara but it’s better to use the one for brows Pict 6: Put warm medium brown on your crease Pict 7 : On your lash line put black pencil eyeliner for your base Pict 8 : Blend it upward to create a half circle shape Pict 9 : Put a metallic/shimmery grey shadow over the base Pict 10 : Put black eye shadow on the inner and outer corner of the lid, leaving the center blank. If you want the round eye look, do not make the “v” shape on your outer corner Pict 11 : Take a white/silver eye shadow with your finger and pat it just on the center of the lid. I forgot to take a picture of this, but i put a light creme shadow on my browbone. Pict 12 : Line your lash line with black liquid liner, i don’t put on a wing but you can do it if you want more of a cat eye look rather than a rounded eye Pict 13 : Line your water line with kohl/ pencil liner Pict 14 : Blend the liner with the medium brown Pict 15 : Curl your lashes. Pict 16 : Coat the lashes with mascara. You can put false lashes to make it more glam but i choose not to. Pict 1: Prime kelopak mata kamu baik menggunakan primer mata atau concealer Pict 2 & 3: Bingkai alis menggunakan pensil alis Pict 4: Isi alis kamu menggunakan brow powder, gunakan gerakan mengarsir agar terlihat natural Pict 5: Set alis menggunakan alis maskara, aku pakai maskara biasa tapi lebih baik kamu pakai yang buat alis karena warnanya coklat. Ini bikin alis tahan lama dan juga nambahin warna di alis. Pict 6: Pakai eyeshadow warna cokelat kemerahan pada lipatan mata Pict 7: Pada garis bulu mata, pakai eyeliner pensil hitam untuk dasar eye shadow. Boleh berantakan karena nanti akan di blend Pict 8: Blend eyeliner tadi ke atas hingga membentuk setengah lingkaran Pict 9: Letakkan eye shadow berwarna abu-silver mengilap/metalik di atas eyeliner tadi Pict 10: Pakai eye shadow hitam di sudut dalam dan luar, meninggalkan tengah tengah kelopak kamu kosong. Kalau kamu mau efek mata bulat, jangan bentuk eye shadow di ujung luar mata seperti huruf “v” karena itu malah membuat efek cat eye. Karena warna eye shadow di ujung lebih gelap dibanding di tengah, bikin efek mata terlihat lebih bulat. Ingat, daerah yang diberi warna terang terlihat lebih besar dan yang diberi warna gelap akan terlihat lebih kecil. Pict 11: Ambil eye shadow putih/perak dengan jari kamu dan tepuk tepuk di tengah kelopak. Aku lupa untuk foto nya, tapi aku pakai eye shadow warna creme di tulang alis Pict 12: Di garis bulu matkamu, pakai eyeliner liquid warna hitam, aku ga bikin wing di ujungnya karena aku sengaja bikin efek mata bulat, tapi kalau kamu mau bikin efek cat eye lebih baik buat wing Pict 13 : Pakai eyeliner pensil di garis bulu mata bawah kamu Pict 14 : Blend eyeliner tadi dengan eye shadow warna coklat Pict 16: Coat bulu mata dengan maskara. Kamu bisa nambahin bulu mata palsu untuk efek lebih glam. Final look!
Thank you for reading until the end of this post! Have an awesome daay! xo’s Nadya. Product used :
Revlon Photoready in Natural Beige Maybelline Age Rewinder in Neutralizer Rimmel Stay Matte Powder in Transparent Nyx Powder Blush in Pinched Wardah Lipstick in 37 PAC eyebrow pencil in 02 Nyx Eyebrow Cake Powder in Brunette UD Naked Palette in Virgin UD Naked 2 Palette in Foxy and Blackout Wet n Wild Comfort Zone Palette in Definer NYC Bronzer in Sunny (use it as eyeshadow on the crease) MakeOver Liquid Liner Maybelline The Falsies Mascara L’Oreal False Lash Wings Mascara

Disney Cinderella Movie 2015 Makeup and Hair Tutorial

Image Source : http://cdn.collider.com/wp-content/uploads/cinderella-image-lily-james-4.jpg BAHASA INDONESIA POST ALERT!!!!!!!!! Maret 2015 ini, Disney ngeluarin remake Cinderella. Pasti dong cewe cewe yang masa kecilnya sering di dongengin Cinderella, excited mau tau kayak apa sih remake tahun 2015 nya. Nah aku juga penasaran nih, aku belum nonton filmnya dan tadi pagi baru cek trailer nya, menurutku pemeran Cinderella yaitu Lily James cantik banget dan cocok jadi Cinderella. Lalu aku kepikiran buat tutorial makeup dan model rambut Cinderella pas dateng ke pesta di Istana. Here it is for you guys! Base : Foundation-Concealer-Powder
1. Jangan lupa pakai pelembab dulu, supaya kulit wajah gak kering. Walaupun jenis kulit kalian berminyak, tetap perlu pelembab loh. Aku pakai Cetaphil Daily Moisturizer. Mengaplikasikan moisturizer selalu dibawa keatas ya, untuk menghindari penuaan dini. 2. Lalu aku pakai foundation untuk meratakan skin tone di wajahku supaya flawless kayak Cinderella. 3. Foundation tadi, aku blend menggunakan kuas multi-task dari Real Techniques. Caranya dengan menggunakan gerakan memutar ya sampai foundationnya menyatu dengan kulit, smooth dan ga kayak pake topeng. 4. Karena lingkaran hitam dibawah mataku parah banget, concealer aja ga cukup buat nutupinnya jadi aku pake corrector berwarna orange dulu. Lingkaran bawah mata itu biasanya berwarna kebiruan kan makanya kita kasih lawan warnanya (complementary color) yaitu oranye agar oranye bisa menutupi warna biru dibawah mata. 5. Setelah itu, baru aku pake concealer di bawah mata dan di kelopak mata. Fungsinya supaya eye shadow yang akan kita pakai nanti lebih nempel. Aku juga pake concealer ini di tengah kening, hidung, dan dagu sebagai highlight. Apapun yang kita kasih warna terang, bakal keliatan lebih maju itu kenapa highlight bisa bikin hidung terlihat lebih mancung hehe. 6. Tada! Setelah di concealer nya di blend jadi kayak gini. 7&8. Karena wajahku cenderung berminyak di daerah T, aku perlu pakai bedak supaya ga luntur dan ga mengkilap nantinya. Tips dari aku, aplikasikan bedak menggunakan sponge atau powder puff, di tepuk tepuk aja jangan di seret supaya foundation dan concealernya ga keganggu. Baru setelah itu kalian sapu dengan brush. Kalau aku, bedaknya ga langsung aku sapu dengan brush, biasanya aku pindah ke mata dulu sambil nunggu bedaknya benar benar set di kulit. Eye : Brow-Shadow-Lashes
1. Bingkai alis menggunakan pensil alis. Alis Cinderella sangat natural tebal, dan lengkungan alisnya atau arch tidak tajam. 2. Isi alis dengan brow powder berwarna coklat tua. Isi nya diarsir ya untuk niruin rambut rambut yang sebenarnya supaya natural jangan buat garis lurus. 3. Sisir alis agar terlihat natural dan rapih. 4. Ulaskan eye shadow berwarna krem di seluruh kelopak mata. 5. Dengan kuas yang fluffy, gunakan eye shadow cokelat muda di lipatan mata. Blend kearah atas ya. 6. Dengan kuas yang lebih kecil, ambil eye shadow coklat tua dan ulaskan di ujung luar mata, buat seperti bentuk huruf “V” 7. Gunakan eyeliner coklat di garis bulu mata atas. Aku saranin warna coklat supaya lebih natural, karena Cinderella dandanan mata nya natural banget. 8. Beri warna krem/putih di ujung dalam mata dan di tulang alis. Aku saranin yang ada shimmernya. 9. Jepit bulu mata supaya lebih lentik. 10. Pakai maskara. Disini aku ada dua opsi, kalian bisa pakai bulu mata yang natural atau kayak aku, pakai 2 macam maskara supaya lebih lentik, panjang, dan tebal. Kelihatan kan bedanya. Last Touch : Contour-Blush-Lips
1. Sapu sisa bedak yang tadi masih menempel diwajah. 2. Kontur wajah tipis tipis menggunakan contour powder atau eyeshadow coklat tua. Ulaskan di bawah tulang pipi dan di tepi kening/jidat. 3.Kontur juga sisi hidung agar hidung kelihatan lebih tinggi. 4. Ulaskan perona pipi warna pink di pipi, blend ke atas sepanjang tulang pipi hingga ke garis rambut. 5. Menggunakan pensil bibir berwarna merah muda, garis tepi dari bibir. 6. Blend garis tersebut ke arah dalam bibir. 7. Ulas lipstik berwarna pink muda ke bibir. Hair :
1. Keriting rambutmu terlebih dahulu, bisa pakai curling iron, di blow, ataupun kamu roll. 2. Pisahkan bagian rambut di depan kuping. boleh kamu jepit dulu supaya tidak mengganggu. 3. Ambil rambut dari belakang-bawah kuping. 4. Sekarang kita akan mengepang dengan gaya rope braid. Kalau menurut kamu terlalu susah, kepang biasa aja juga bagus kok! Oke, sekarang bagi rambut menjadi 2 bagian, putar masing masing bagian ke arah yang berlawanan. 5. Lalu lilit dua bagian rambut tersebut menjadi satu. Jangan sampai putaran yang awal terlepas ya. 6. Rambut yang tadi kamu sisakan, bawa kebelakang. Lalu bawa kepangan ke sisi kepala yang lain supaya seperti bando. Jepit menggunakan bobby pin 7. Ulangi step 1-6 di sisi kepala yang lainnya. Voila! Selesai juga makeup dan hair tutorial ala Cinderella a.k.a Lily James. Menurutku look ini cocok banget untuk kalian pakai ke acara semi-formal seperti pesta ulangtahun teman atau bahkan prom! Kalau ada pertanyaan boleh komen di sini atau ke halaman ask a question. Good luck on trying this look and have a nice monday guys!! xo’s Nadya.
Product Used : Revlon Colorstay Foundation in 220 Natural Beige Nyx Above and Beyond Full Coverage Concealer (used as the corrector) Maybelline Age Rewinder in Neutralizer Rimmel Stay Matte Powder PAC eyebrow pencil in 02 Nyx Eyebrow Cake Powder in Brunette UD Naked and Naked 2 Eyeshadow Palette in Foxy, BootyCall, Tease, and Naked. MUFE Face Contour Kit in 2 Wet n Wild Blush in Heather Silk Maybelline Mascara The Falsies L’oreal Mascara False Lash Wings Just Miss Lip Pencil in J-18 Victoria’s Secret Lip Sheen Boudoir Pink